The A-level textbook we use has a nice picture of the circumcircle of a triangle and a definition, plus a brief description of how to work through them. For those who are pondering what a circumcircle is, click on the image or link below
Image credit: WolframMathWorld
I’ll just stick to basic vocabulary in this post, rather than the formal circumcentre and circumradius.
Back to the book – not exactly inspiring or memorable stuff!
I looked at the class and off the cuff changed the lesson plan.
Equipment
- Plain paper
- Pencil
- Ruler
- Compasses
- Calculator
Step 1
Draw a decent size triangle on the paper. Label the corners A,B,C.
Step 2
Using geometrical constructions, find the centre of the circle that your triangle fits in. Check by actually drawing the circle
Step 3
Discuss what techniques gave the best results – hopefully you’ll have perpendicular bisectors. There is a nice comparison between bisecting the angles (which some students will do) and bisecting the sides. The angle bisectors always cross inside the triangle, the side bisectors don’t.
Step 4
Randomly generate co-ordinates for A, B, & C. Get the students to pick them and then they can’t moan if the calculations are awful.
Step 5
Discuss how you are going to find the centre and radius of the circumcircle. We decided on:
- Only use two sides
- Find the midpoints
- Find the gradients and hence perpendicular gradients
- Generate the equations of the lines through the midpoint
- Find where they intersect
- Use the point and one corner to find the radius
Step 6
Review their methods, looking for premature rounding in questions. I’m still instilling an appreciation for the accuracy of fractions and surds, over reaching for the calculator.
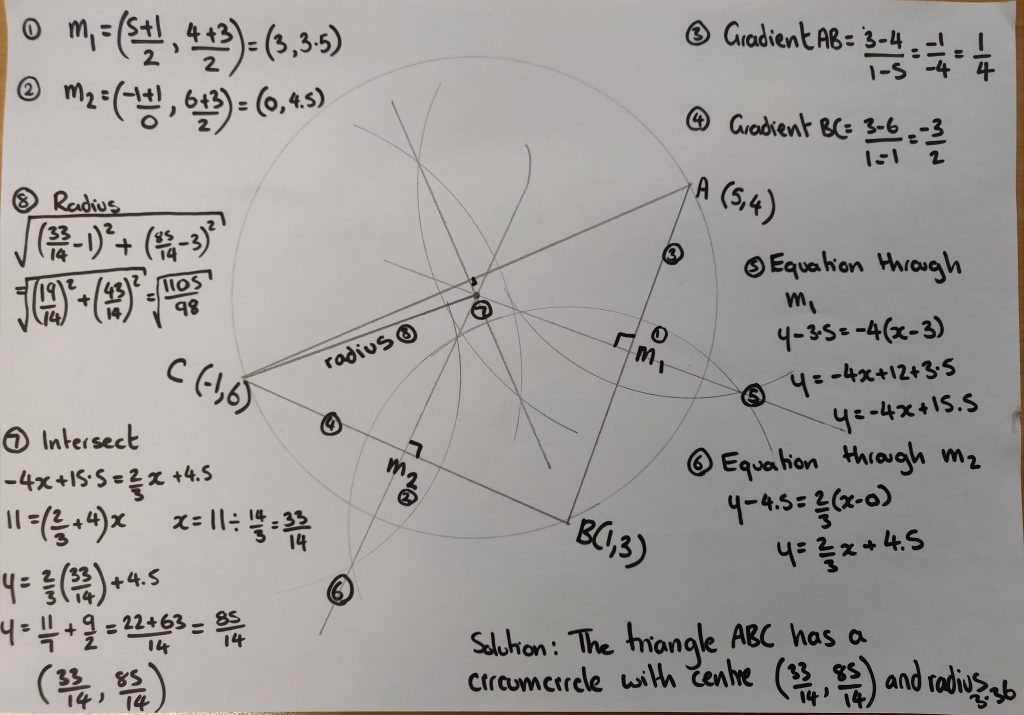
Step 7
This is how my solution looked – I numbered the picture and the steps so students could follow the logic. I was answering on one page projected on screen.