Category Archives: Pure

363. A-level Exam misconceptions 2022

It’s been a while, but I’m back. Crazy times and all that!

Today I’m sharing a presentation about my thoughts on the Edexcel A-Level Maths papers, from the perspective of reviewing students papers. As a KS5 Co-ordinator I am asked by students to look at borderline papers before they send them off for a paper review.

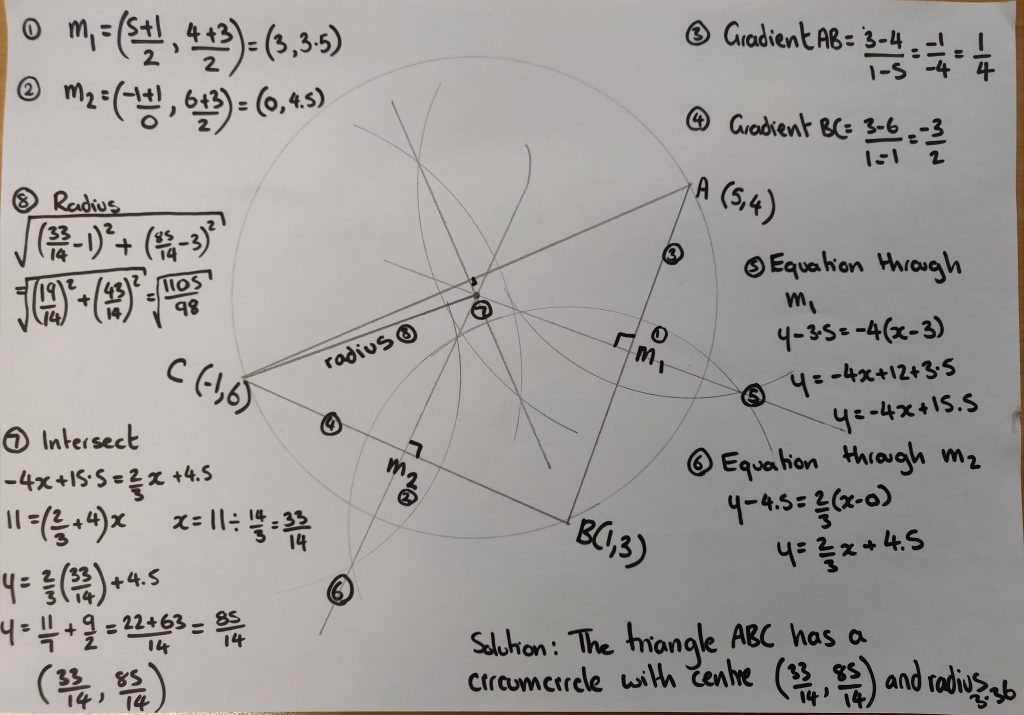
The mark schemes were very clear on where marks should (or should not) be awarded. This presentation (or set of posters) highlights the most common student errors I spotted during my reviews. I would also say that these are most frustrating issues as they are so easy to fix. Unfortunately it highlights the lack of formal external exam experience this cohort had, through no fault of their own.

These resources are geared towards the Edexcel papers, but I’m sure the skills are equally appropriate for other boards. Also a hat-tip to Jack Brown & TLMaths as I have linked one of the misconception slides to his video on hidden quadratic equations (thank you!).

Exam misconceptions 2022 (PPT editable)

Exam misconceptions 2022 (PDF)

Personally, I’m going to print these out and put them in my A-level display corner. I might use the actual presentation after the Y13 mocks to see if they’ve fallen for the same issues. I hope not!

357. It’s not square!

I do love a little challenge for A-level Further Maths students. They are often confident and very capable mathematicians, but occasionally overlook the small details. This challenge looks into which strategies students use when working with 3D vectors, lines and angles.

The most annoying thing? There is no single correct answer.

What is the investigation?

Students start with two points, create a line, construct two perpendicular lines and then join up the lines – did they create a square? How do you know? Justify it?

Download the instructions here: It’s not square (docx), It’s not square (PDF)

Skills required

  • Distance between two points
  • Equation of a line in three dimensions
  • Scalar (dot) product

Solution/Discussion point

  • Students need to use the same direction vector for both perpendicular lines too create a square
  • The two new corners need to be n the same direction away from the original line (not one above and one below)
  • It’s interesting to discuss what non-squares they made. Technology could be used to plot them in 3D.

352. Functions refresher

We recently finished teaching the AS Maths syllabus to Year 12. My colleague and I decided how to split up the start of the second year of the course. I’m starting with the modulus function.

I took one look at the skills needed at thought “Uh-oh”. The students are going to be out of practice with this. They are a lovely group, with a wide range of ability, but we’ve been very focussed on Applied Maths recently.

Option A: Go for it and patch up the vocabulary as we go (getting very frustrated – they knew this last October)

Option B: Break them in gently, recap the skills and vocabulary and extend them further

Option C: Reteach the work from last October.

Yes, you guessed it. I went with Option C. I found a brilliant task on piecewise function graphs on the Underground Maths website.

Image credit: https://undergroundmathematics.org/

There are four graphs given. The basic task is to interpret the functions relating to each graph, through description or function.

I photocopied the graphs onto card and sliced them up. Each group had a set of cards. One person described a graph and the others had to accurately draw it. Some students went straight onto squared paper, others drafted it out on mini whiteboards. They repeated this until all the graphs were drawn and everyone had had a go at describing (the describer stuck in their card, so that they had a complete set). Whilst they were doing this, I moved around and encouraged the use of mathematical vocabulary.

Note: it was interesting to see how many students had forgotten the significance of open and shaded circles to denote boundaries of inequalities.

The second task was to match up the function cards with the graphs. Once again, accuracy was key as not all graphs had functions and not all functions had graphs. There were also some that nearly, but not quite matched. This activity really brought out the key skills relating to domain, range and function notation that I was looking for. The extension task was to complete the missing pairs.

But, did it work? I can confirm that the following lesson the class made very good progress investing the modulus function and it’s graph, even going as far to solve equations. They knew what the notation meant, how to plot it and how to interpret the graphs.

I really like the Underground Maths website as it has great resources, good support material and always makes students think. Most of the time it gets teachers thinking too!

349. Circumcircle Investigation

The A-level textbook we use has a nice picture of the circumcircle of a triangle and a definition, plus a brief description of how to work through them. For those who are pondering what a circumcircle is, click on the image or link below

Image credit: WolframMathWorld

I’ll just stick to basic vocabulary in this post, rather than the formal circumcentre and circumradius.

Back to the book – not exactly inspiring or memorable stuff!

I looked at the class and off the cuff changed the lesson plan.

Equipment

  • Plain paper
  • Pencil
  • Ruler
  • Compasses
  • Calculator

Step 1

Draw a decent size triangle on the paper. Label the corners A,B,C.

Step 2

Using geometrical constructions, find the centre of the circle that your triangle fits in. Check by actually drawing the circle

Step 3

Discuss what techniques gave the best results – hopefully you’ll have perpendicular bisectors. There is a nice comparison between bisecting the angles (which some students will do) and bisecting the sides. The angle bisectors always cross inside the triangle, the side bisectors don’t.

Step 4

Randomly generate co-ordinates for A, B, & C. Get the students to pick them and then they can’t moan if the calculations are awful.

Step 5

Discuss how you are going to find the centre and radius of the circumcircle. We decided on:

  • Only use two sides
  • Find the midpoints
  • Find the gradients and hence perpendicular gradients
  • Generate the equations of the lines through the midpoint
  • Find where they intersect
  • Use the point and one corner to find the radius

Step 6

Review their methods, looking for premature rounding in questions. I’m still instilling an appreciation for the accuracy of fractions and surds, over reaching for the calculator.

Step 7

This is how my solution looked – I numbered the picture and the steps so students could follow the logic. I was answering on one page projected on screen.