If you are based in NW England or NE Wales, come to the Chester Maths Meet on Thursday 3rd March 2016 (4.15pm to 6pm).

Visit the TeachMeet website to sign up to present or watch: ChesterMM

If you are based in NW England or NE Wales, come to the Chester Maths Meet on Thursday 3rd March 2016 (4.15pm to 6pm).
Visit the TeachMeet website to sign up to present or watch: ChesterMM
My next class neighbour, Mr D, has been evangelising about venn diagrams since he did the TAM (Teach A-level Mathematics) course. His lesson on equations and graphs using venn diagrams was brilliant! Then, at MathsConf5, Craig Barton (@mrbartonmaths) shared his love of venn diagrams.
And they are on the new english GCSE Maths syllabus.
In light of all this, I introduced venn diagrams as a vehicle for probability (Y10) and rounding (Y9).
Introduction
First of all I used the films of Tim Burton, Johnny Depp and Helena Bonham-Carter to introduce a triple venn diagram, with the box to represent everything – I like dropping in the proper forms or technical bits early on in all topics.

We had quite a lengthy conversation about films, including why the Bond film could be on the diagram. The discreet use of IMDB (with my permission) settled some arguments too!
Rounding
I wanted my Year 9s to consider the differences and similarities between different forms of rounding. I created a simple diagram for them to complete where they compare ‘nearest ten, ‘one decimal place’ and ‘two significant figures’. You can download it here:
Rounding Venn Diagram worksheet
Probability
For my probability lesson I used the probability PowerPoint by Craig Barton. You can link to his resources here:
Are you a fan of ‘The Mr Men’? Are you a hopeless Maths geek? Get yourself over to SolveMyMaths!
I’m sure I’ve mentioned the brilliant Maths Mr Men and Little Misses before. Here is what I did with the set I printed and laminated (click on each picture to enlarge):

There are three sections to this display: the title tetrahedron, the mobile and the invisible wall.
Title tetrahedron

You will need: six garden canes, four strong elastic bands, sugar paper, tape and your title.
It’s a straightforward tetrahedron made from canes, with the corners secured with elastic bands. Then stick your title to the paper and wrap it around one face, trimming sticky-out bits and securing with tape. It ‘s a good way to make sure no one accidentally walks into your mobile.
The mobile
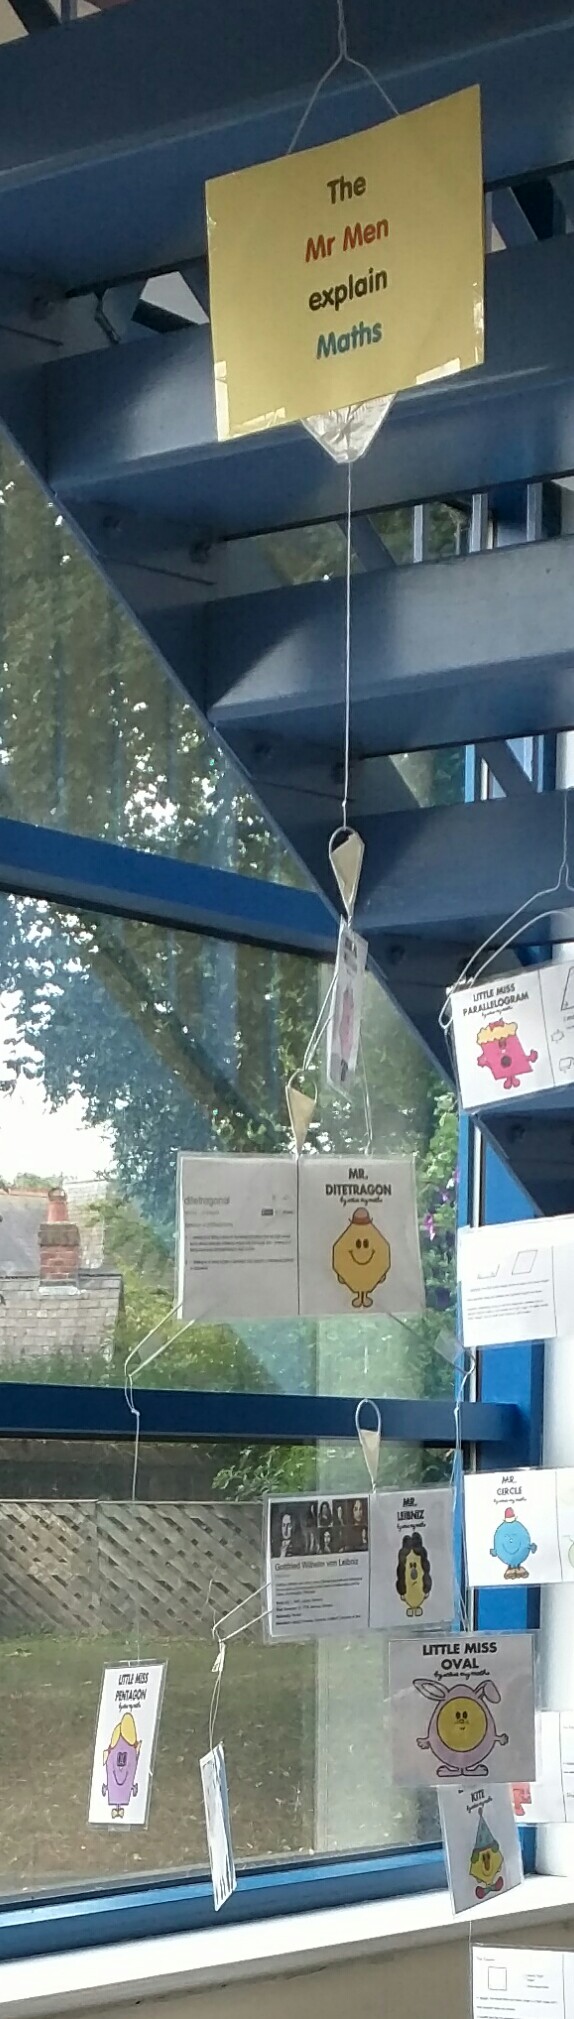
You will need: four wire coat-hangers, tape, Mr Men cards, fishing line and your title
My mobile is long and narrow because of the space I hung it in. The title hanger has been stretched into a rhombus shape and had a long loop of fishing line attached. The ends of the line were covered in white duct tape which you can see at the bottom of the title as a white triangle. The title was attached front and back.
The lower hangers were bent into a ‘C’ shape by pushing the straight base of the hanger upwards. Tape was wrapped near the ends of each arm to ensure the hanging shapes don’t slide along. Fishing line is threaded through the loops at the end of the arms and knotted. The knots are concealed inside the Mr Men cards, which were one sided. When I attach the remaining hangers to other things I squeeze the hook closed and cover the join in duct tape – it saves it unhooking later.
Invisible wall
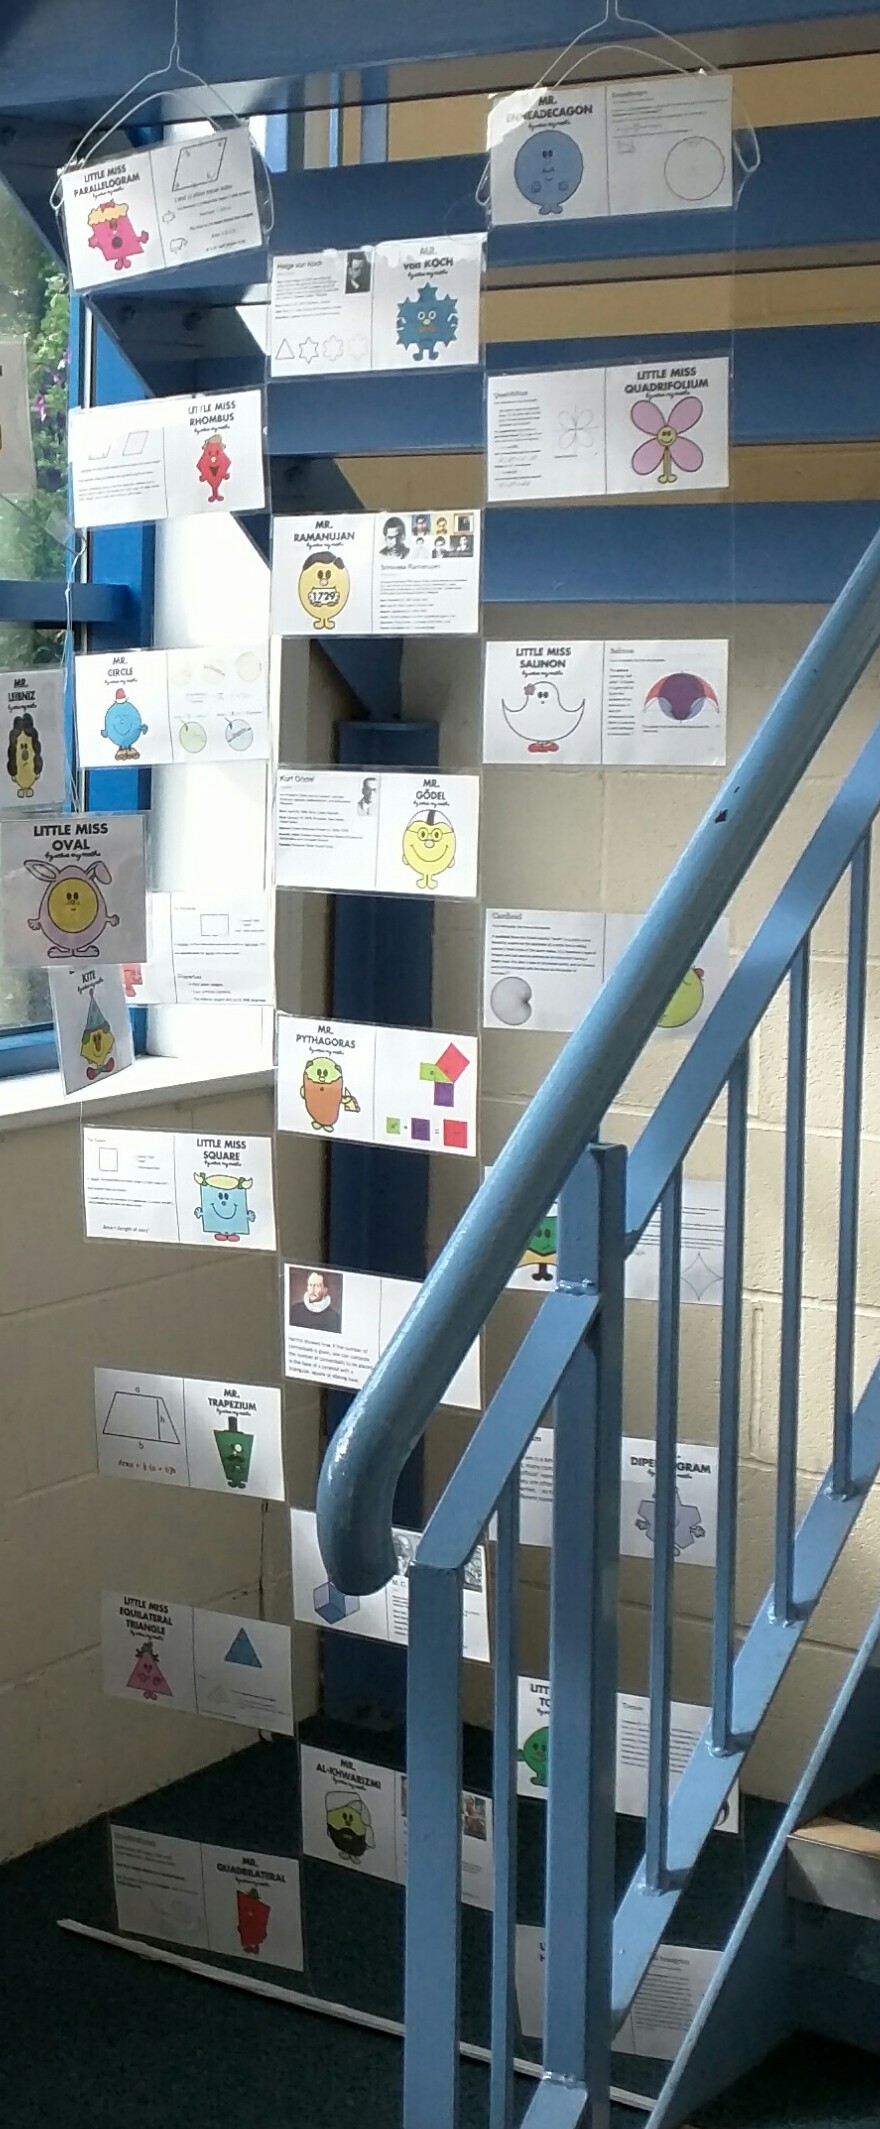
You will need: duct tape, fishing line, wide Mr Men cards, sellotape, two coat-hangers and an old metre stick (or equivalent).
I found an old, split metre stick in the back of the stockcupboard and covered it in duct tape to make it safe. I marked out three Mr Men card widths across and attached long lengths of fishing line. The knots were held secure and camouflaged by more duct tape. I bent the two coathangers into the C-shapes mentioned earlier and hung them in the final position. The next bit is tricky – you need to knot your fishing line to each arm of the coat-hangers whilst ensuring you keep the line parallel and the hangers level. I found standing on the metre stick was very helpful!
That’s your invisible ‘wall’ set up – now for the wall display!
Attach your first two Mr Men cards between lines 1 & 2 and 3 & 4 by wrapping tape around the ends of the cards, encasing the line at the very end. Attach your third card above the first row between lines 2 & 3. Keep repeating until you wall is complete. I decorated the hangers with extra cards.
Safety
As you can see, my display is hanging off a metal stair case. For safety, I flattened the coat-hanger hook against the stair rise and sealed it with duct tape so no one will catch their toes.
Observation
I’ve already seen a student stand in-front of the display and discuss it with her teacher and lots of students are actively looking/reading as they go up the stairs. It’s only been up two days and it is a talking point. It’s sure to grow as there are more Mr Men & Little Misses that I haven’t yet printed.
Thank you @solvemymaths!
I have a Pi-loving colleague who is a whizz with voting presentations.
Mr D created these review activities for use with A2/C3 students. The focus is logarithms, exponentials and Ln functions, including models for growth and decay. I particularly like the equation measuring boredness in a Maths lesson. It’s obviously wrong – how could a Maths lesson possibly be boring?
Exponentials and logs review (pptx)
Exponentials and logs review (ppt)
Optional Variation
We paired up this presentation with Qwizdom voting handsets. If you don’t have them, you could try out Socrative and turn students’ mobile phones into voting handsets
I can’t wait to share the resource I stumbled across this week. I had planned a lesson on distance-time graphs, for my Foundation GCSE class, at home and went into school to print out my resources, only to discover the photocopier was broken! I went to the TES website and found this brilliant set of resources on distance-time graphs. They required a small amount of printing, but engaged a ‘bouncy’ class very effectively!
Hare-and-The-Tortoise-Distance-time-graphs by lttmaths.
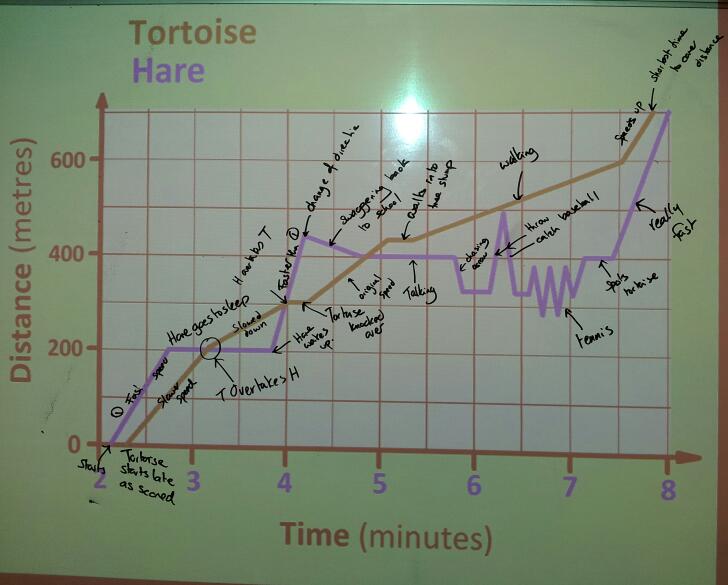
Go and try out these resources next time you are working with distance-time graphs!
I love tessellation! You get the chance to be a bit more artistic and creative. I’m a fan of this particular website too: http://www.tessellations.org/ The website has examples of fine art and student work, how to make different types of tessellations and even 3D tessellations.
Now I’m sure we all often use tessellation as a homework – the ‘Finish off your amazing classwork at home’ kind of thing. When collection time comes you get many different standards of work:
All, apart from the last case, can be enhanced and developed with the use of a laminator and a guillotine.
Why a guillotine?
To trim off rough edges and forgiveable errors where the student got muddled at the edge of the paper.
Why a laminator?
Laminating the work flattens out any crushed/folded bits. It also preserves decorative edgings when the work is on the wall.
Students who spend ages with coloured pencil produce lovely work which just doesn’t stand out:

However, laminating it makes the colours more vibrant:

It’s hard to show the difference in a photograph, but take my word for it – it works!
You mentioned feedback?
It’s tricky to feedback on visual work without writing an essay or scrawling over the work. A simple solution is to use a marker pen to write on the laminate. Hand out the laminated work and board pens. Students can critique each other’s work by drawing around the individual tiles and annotating them, any errors can be highlighted and other comments made. The wipe-off pens make it less threatening and avoid permanent marks. The great thing is that the original work is not damaged and all comments can be removed with a damp cloth. Of course if you are using this for a wall display teachers may want a more permanent pen for feedback.
Final display
These works of art will be more hardwearing than your average display. You could hole-punch the corners and tie them together to make a wall hanging. You could laminate work back to back and hang them from the ceiling. You could even use the wall hanging as a temporary curtain if you have a rail in your room.
Here’s a two in one post for you, with a wooden theme:
Tree 1
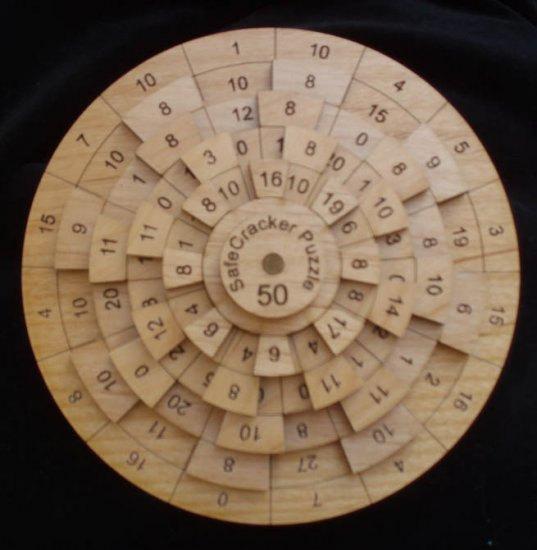
This fascinating wooden puzzle is available on Etsy. Each line has to add up to 50 – simple? Not as easy as you’d think. A perfect classroom extension puzzle or gift for a puzzle fanatic!
Tree 2
A little starter on logarithms, with a touch of safecracking too!
The questions are sourced from an A-Level textbook – why not make your own textbook tasks more interesting by creating your own safecrackers on the board? Five minutes prep = puzzle fun!