351. No more glue sticks

Apologies for the infrequent blog posts. Life happens.

I thought I’d share an inspired idea that I saw on Twitter. AJSmith (@MrSmithRE) shared this brilliant video on how to efficiently use hole punched exercise books.

Hole punching exercise books

I converted to using A4 exercise books with Year 11 in September and the improvement was amazing. From low ability students who wanted to bin their Year 10 notes (Do I have to keep them?), to so much pride in their work that they are still using their A4 exercise books for personal study and revision whilst on study leave.

Now I’ve seen this video on tagging notes together, this could be a game changer. Fewer sheets stuck in means fewer pages filled with stuck in sheets, which means the books will last longer. So the Department saves on the cost of both glue sticks and exercise books. Those infuriating students who seem incapable of sorting out their books have got one less excuse now.

I plan on using this with my new Year 10 class in September – they are the exact opposite of my previous GCSE group, so this should make for an interesting comparison. I’ll feedback how it goes.

Now go and watch that video and start saving for an industrial strength hole punch.

350. Quadratic factor puzzle

Back in posts 95. Quadratic puzzles and 322. Quadratic puzzles I’ve looked at how to approach factorising and solving quadratic equations/expressions in a ‘gentle’ way.

Time to take off the kid gloves!

I have an awesome class of 13 year olds who are starting out on quadratic manipulation. They are great, but there are a significant number who rush their work and skip steps of working out because they ‘know what they are doing’. Really? Let’s see …

I gave the class twelve quadratic expressions and asked them to factorise them, then to spot any common themes. What I didn’t tell them was that all of the factors used were combinations of x, 2x, +/-1 and +/-5. If they were sloppy with their attention to detail, their solution would look like the solution to a different expression. Essentially a difficult easy task.

It soon sorted out those who had at true understanding of factorising a quadratic from those who’d lucked their way through easier questions.

I’ve shared the presentation and pdf version below. I’ve added in two slides where you can cut out the expressions to use as more of a card sort. You’ll notice that there are no 4x^2 expressions – I was focussing on solutions with only one x co-efficient greater than one. Although I used this as a starter, you may wish to use it as a longer activity, depending on your class.

Solving quadratic expressions (PPT)

Solving quadratic expressions (PDF)

349. Circumcircle Investigation

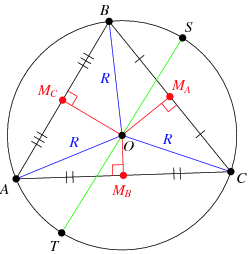
The A-level textbook we use has a nice picture of the circumcircle of a triangle and a definition, plus a brief description of how to work through them. For those who are pondering what a circumcircle is, click on the image or link below

Image credit: WolframMathWorld

I’ll just stick to basic vocabulary in this post, rather than the formal circumcentre and circumradius.

Back to the book – not exactly inspiring or memorable stuff!

I looked at the class and off the cuff changed the lesson plan.

Equipment

  • Plain paper
  • Pencil
  • Ruler
  • Compasses
  • Calculator

Step 1

Draw a decent size triangle on the paper. Label the corners A,B,C.

Step 2

Using geometrical constructions, find the centre of the circle that your triangle fits in. Check by actually drawing the circle

Step 3

Discuss what techniques gave the best results – hopefully you’ll have perpendicular bisectors. There is a nice comparison between bisecting the angles (which some students will do) and bisecting the sides. The angle bisectors always cross inside the triangle, the side bisectors don’t.

Step 4

Randomly generate co-ordinates for A, B, & C. Get the students to pick them and then they can’t moan if the calculations are awful.

Step 5

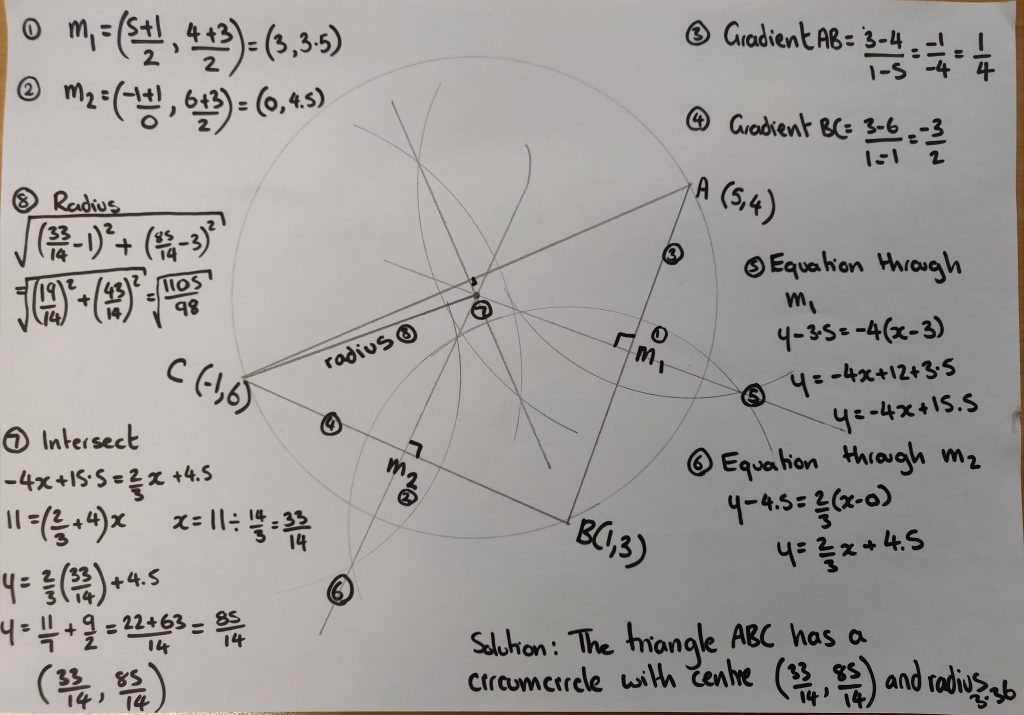
Discuss how you are going to find the centre and radius of the circumcircle. We decided on:

  • Only use two sides
  • Find the midpoints
  • Find the gradients and hence perpendicular gradients
  • Generate the equations of the lines through the midpoint
  • Find where they intersect
  • Use the point and one corner to find the radius

Step 6

Review their methods, looking for premature rounding in questions. I’m still instilling an appreciation for the accuracy of fractions and surds, over reaching for the calculator.

Step 7

This is how my solution looked – I numbered the picture and the steps so students could follow the logic. I was answering on one page projected on screen.


348. A-Level colouring (Updated)

Those of you who follow this blog will know I have a thing for explaining with colours. This isn’t just a gimmick for younger students, it also works for 16-18 year olds.

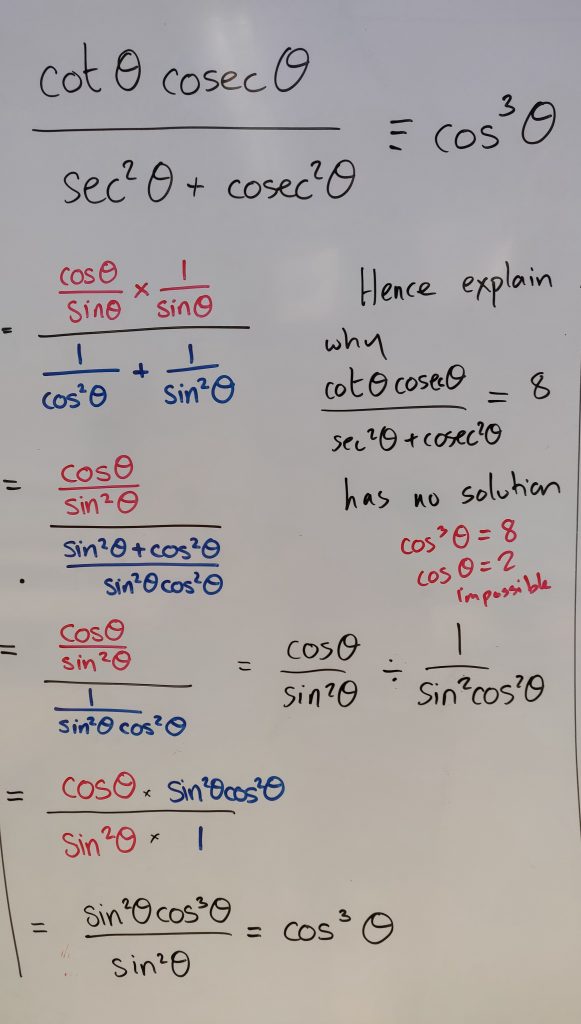
In the picture below we were looking at proving a statement involving reciprocal trigonometric functions and fractions. A common source of misconception with this kind of question is that students split the question into working with the numerator and denominator separately, then make mistakes when they put them back together. They can’t see the big picture.

Image credit: Mathssandpit

When I discussed this on the board I used separate colours for the expressions in the numerator and denominator. The class could follow the logic so easily. It’s probably my most successful introduction to this topic. I saw that some students used highlighter on their notes after I’d gone through it, so they could track the solution.

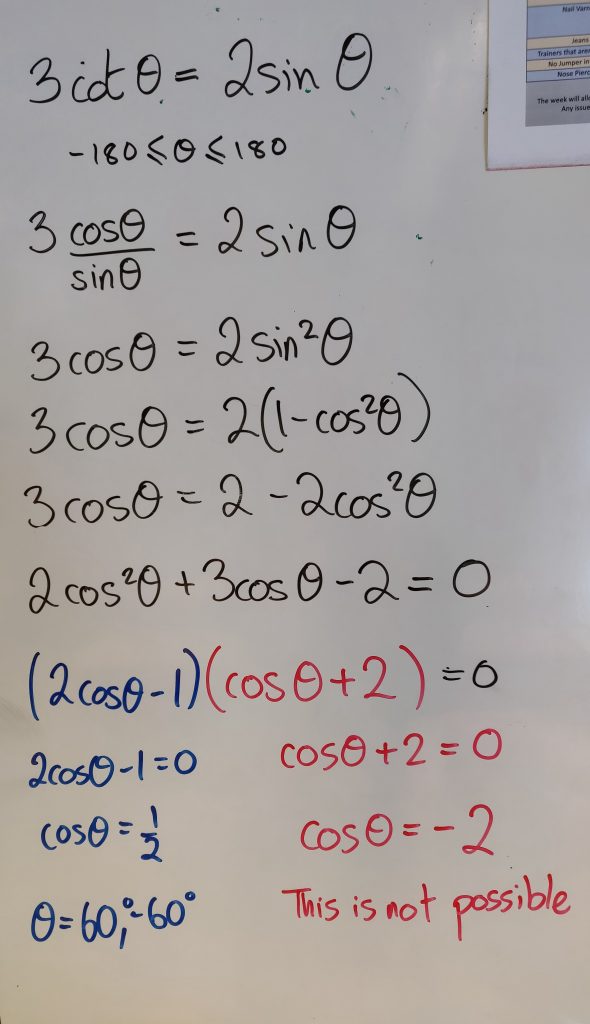
The second type of question we looked at was solving a trigonometric equation. The straight forward expansion was all in one colour, but the roots of the quadratic were highlighted in different colours. The reasoning behind this was that students often solve half the quadratic and neglect the other impossible solution. Our exam board likes to see students consider the other solution and formally reject it. It makes the solution complete. By using a colour, the impossible solution stands out and reminds students to provide a whole solution.

Image credit: Mathssandpit

So when you are planning for misconceptions at A-level, remember that coloured pens aren’t just for younger students.

Update: 22nd October

The brilliant Mr B has shared how he uses colour to identify the forces in perpendicular directions in Mechanics.

347. Maximising space

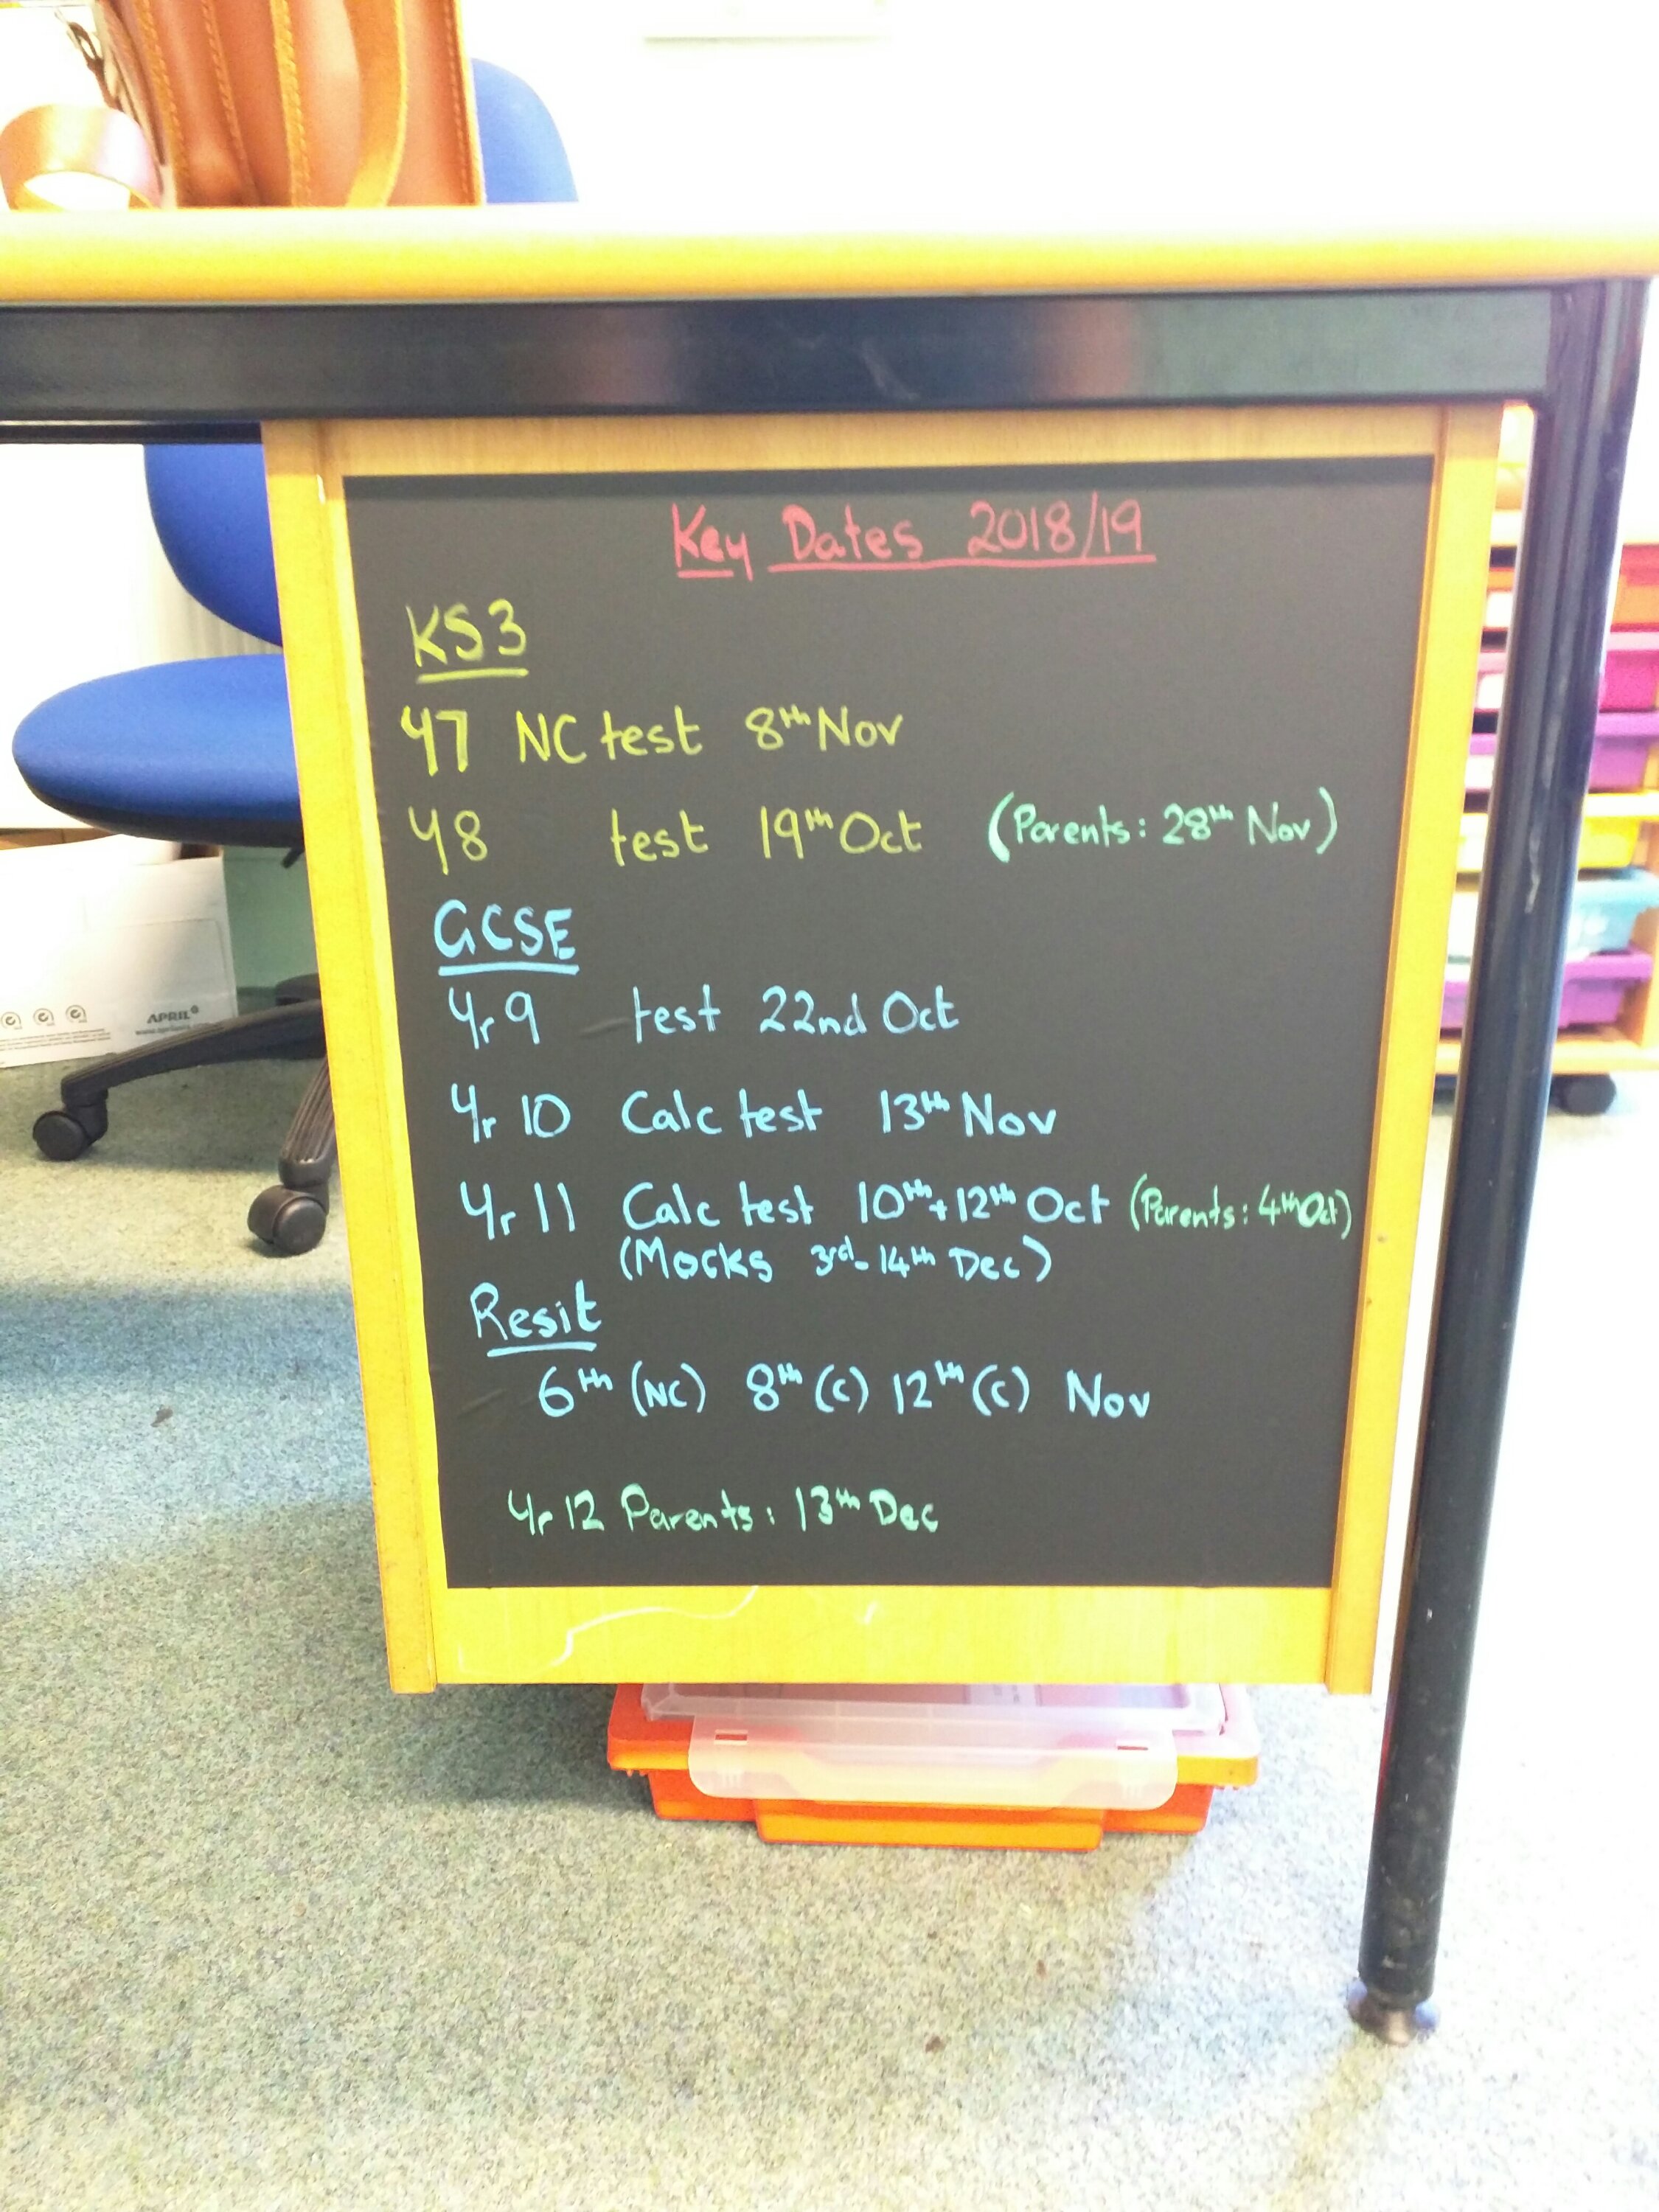
As you start to plan the layout of your (new) classroom, I have a handy little tip for you. It’s really useful to have key dates up in the room, but where to put them. Print them out and you lose valuable wall display space, odds are you’ll forget to update it during the year. Put it on the whiteboard and you risk some scamp (or over enthusiastic colleague) wiping them off the board.

How about a blackboard?

This is sticky back blackboard vinyl that you can get very cheaply from places like ‘The Works’ or Amazon. You can cut it to size and put it on any flat surface. I’ve put it on the back of my desk and used chalk pens. Once they dry they take some effort to remove.

Students have already noticed it and have said they like having a big picture of what’s going on next term.

346. Area & Volume conversion

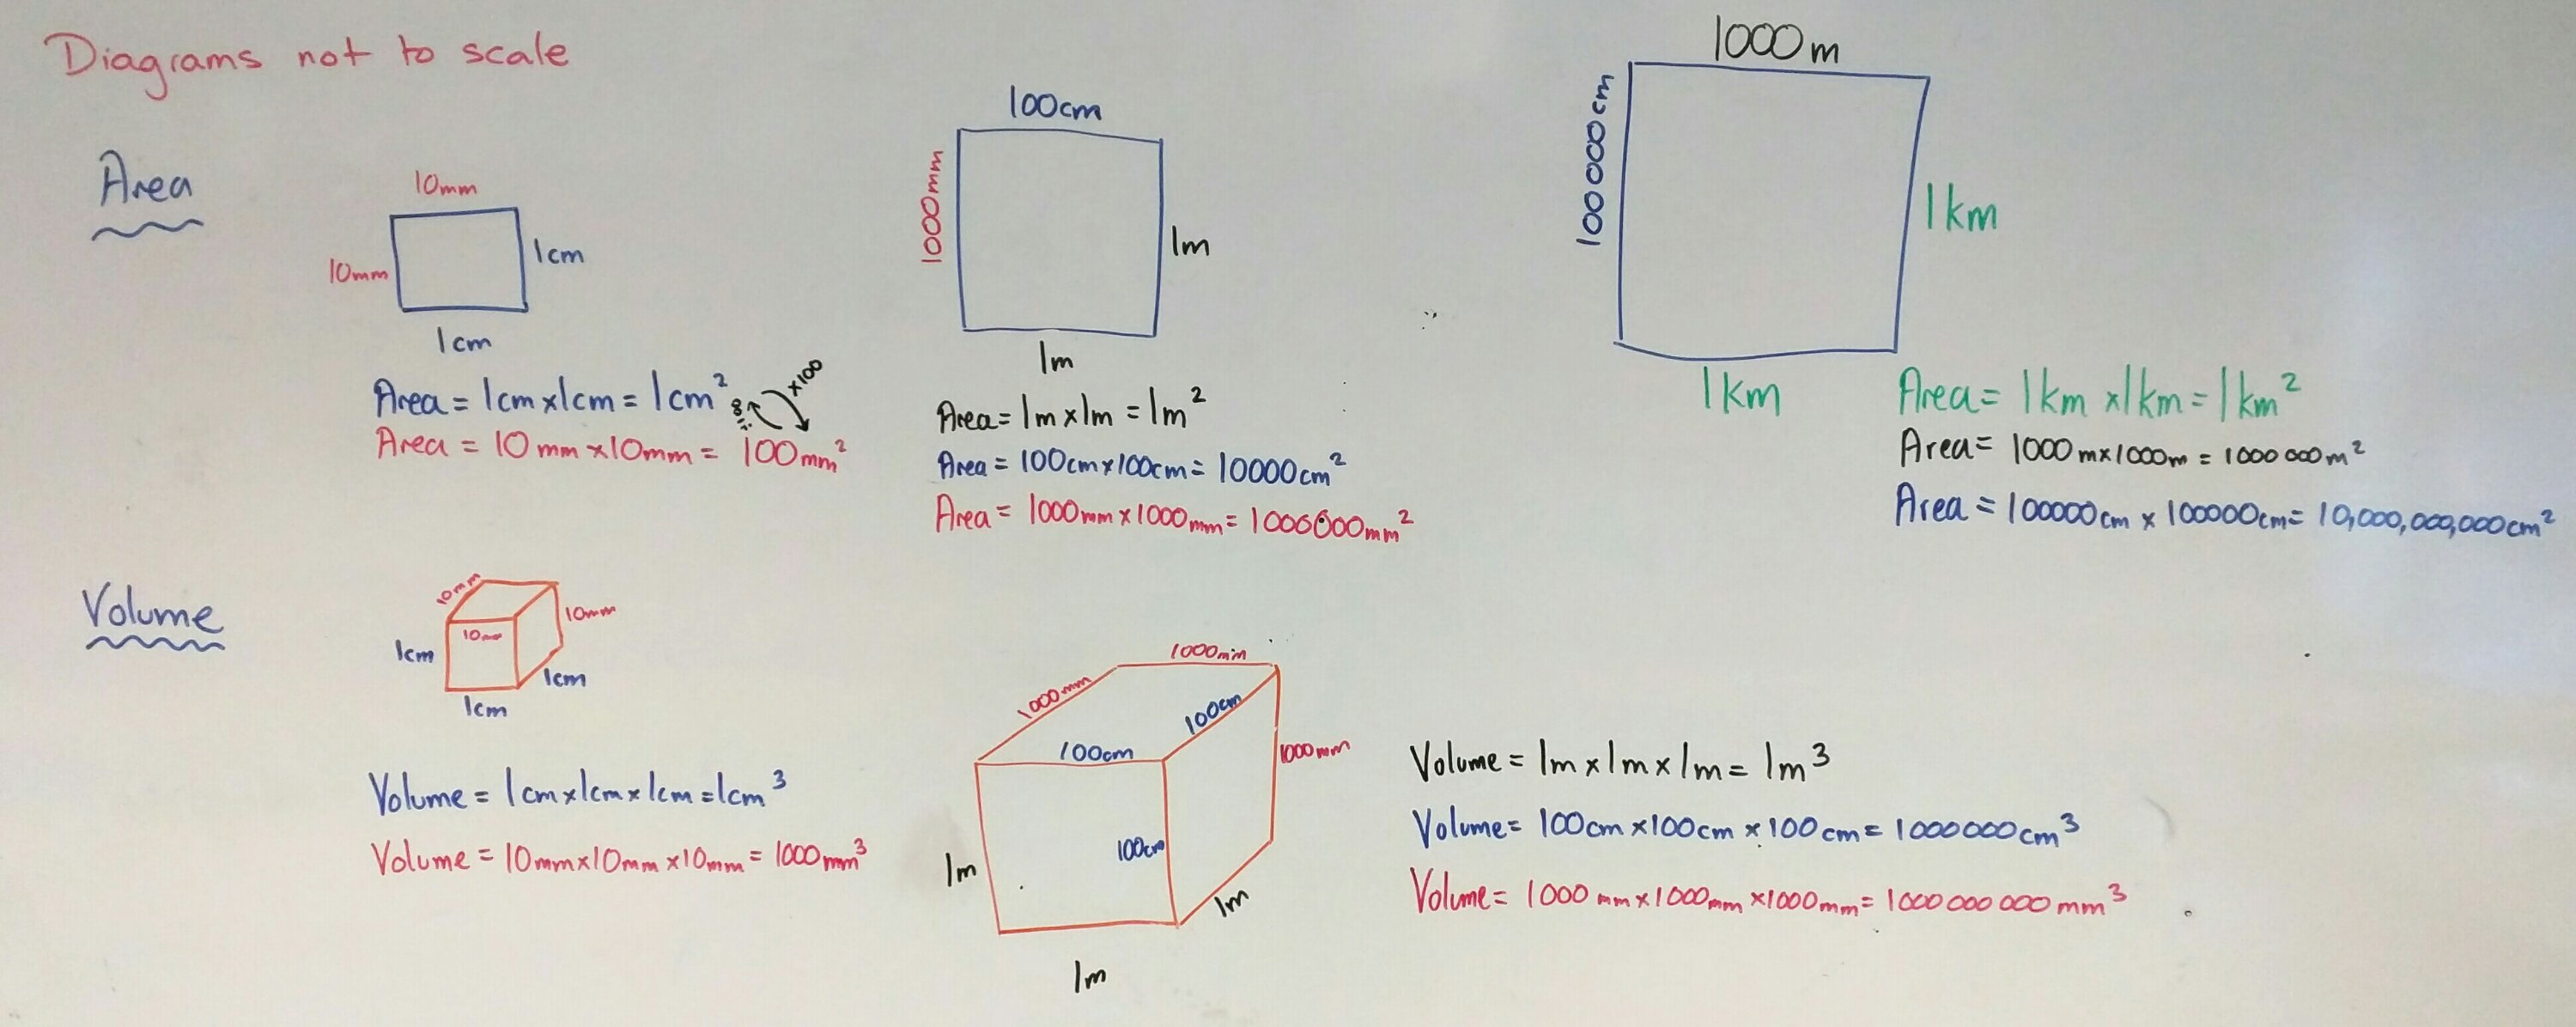
This is a quick post on how I teach metric unit conversion for area and volume. All you need is a big whiteboard and coloured board pens.

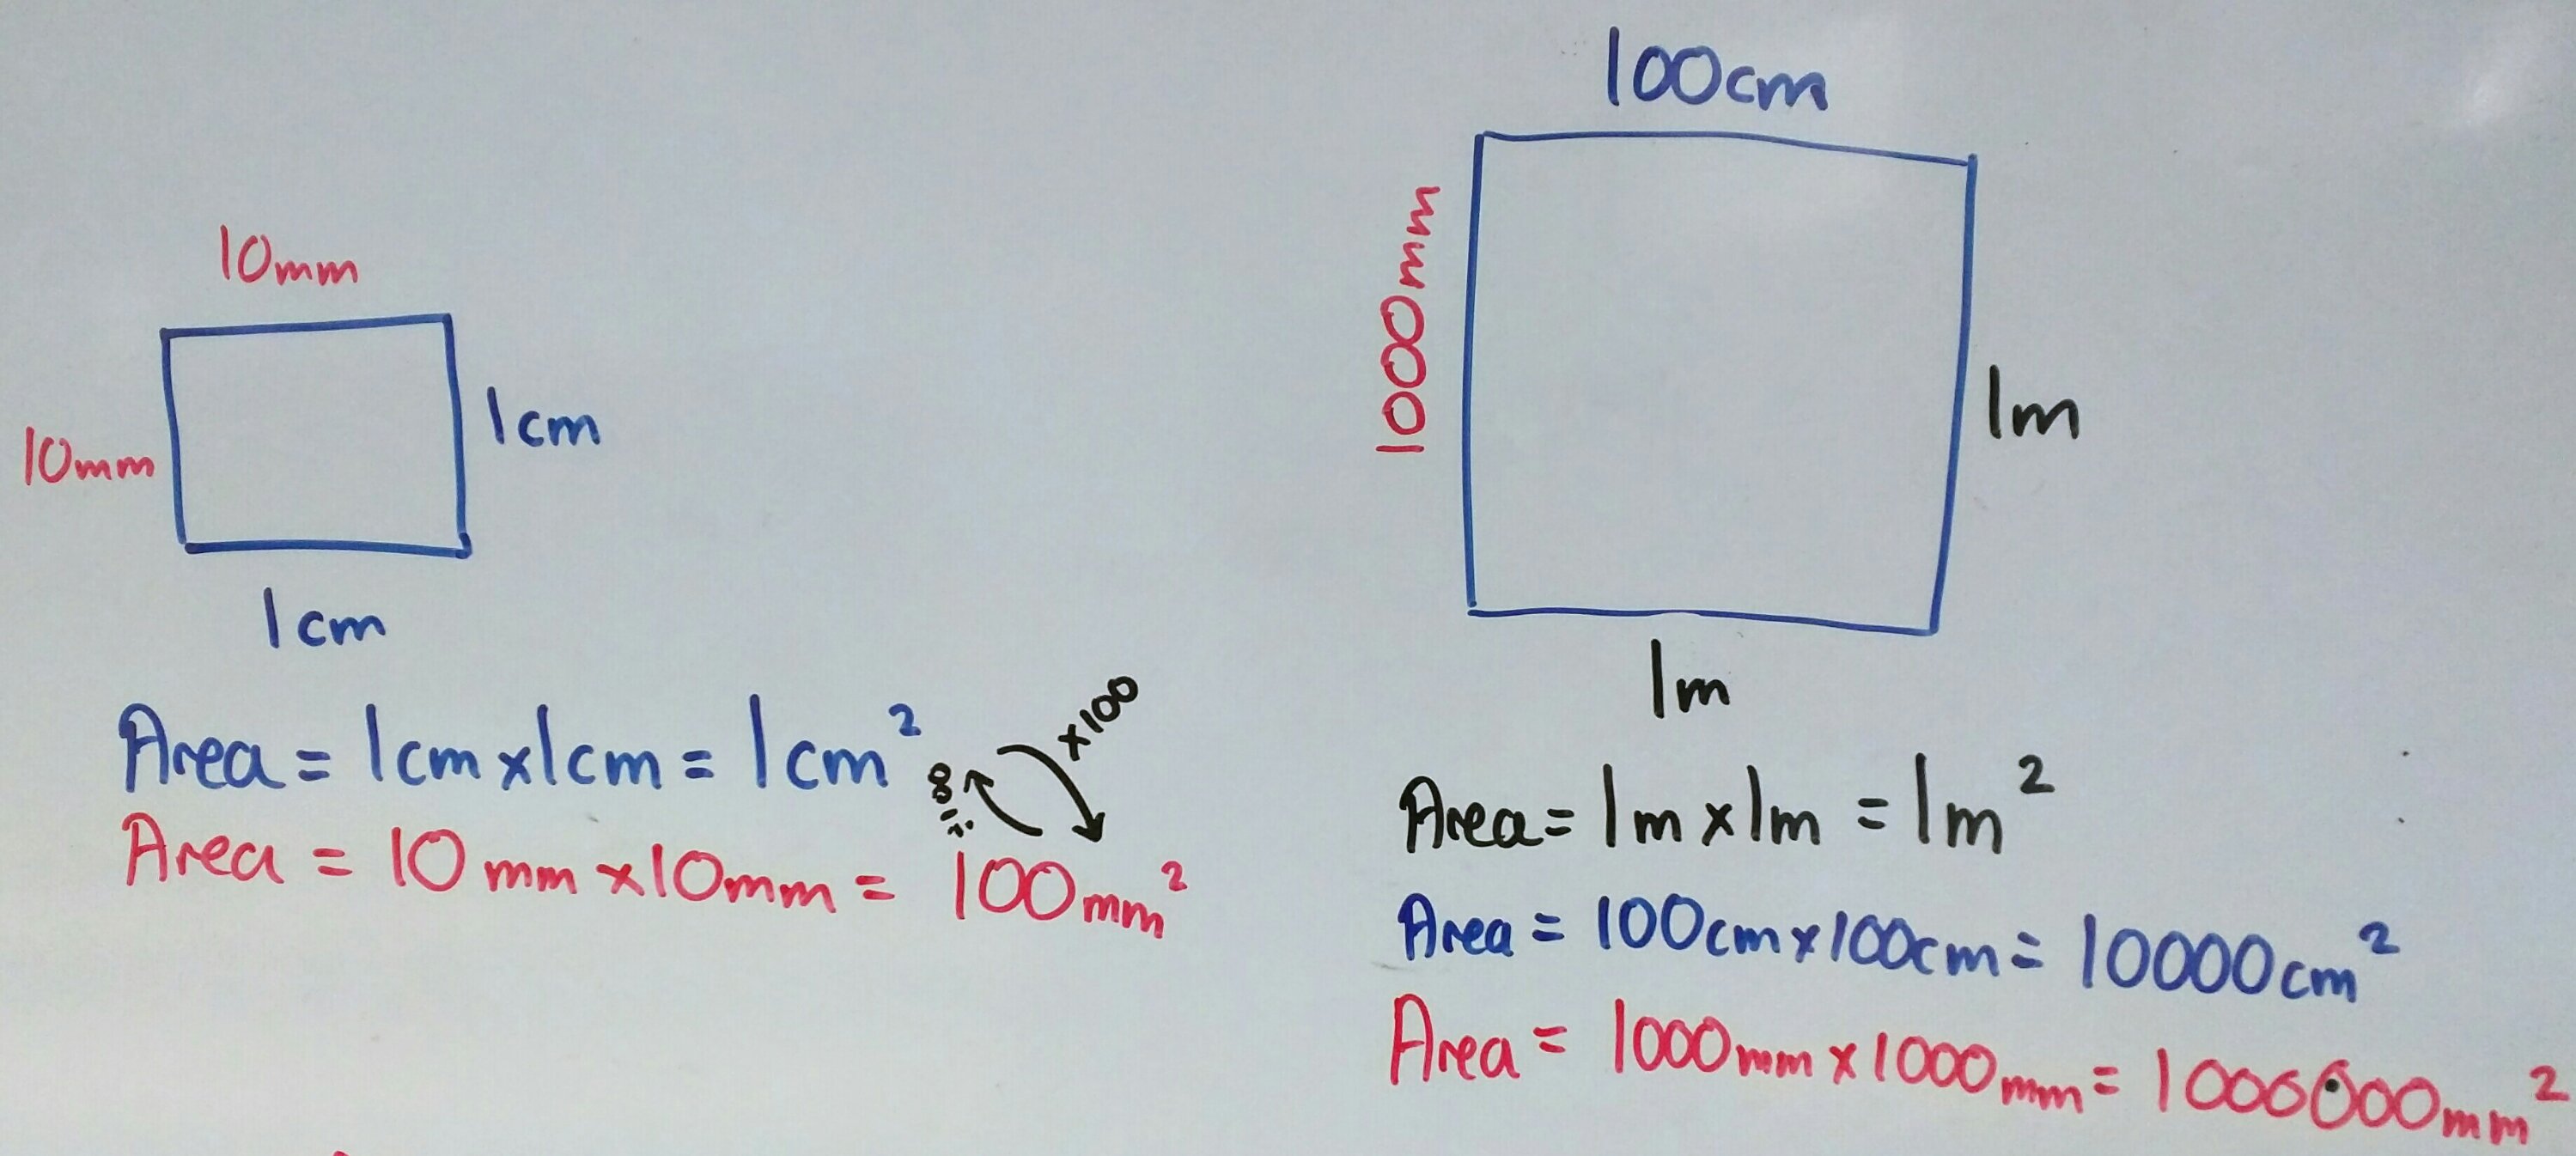
Start by stressing that all diagrams are not to scale/accurate.

Two colours

  1. Draw a square on the board
  2. Pen colour 1: Label it as 1cm
  3. What is the area? Show the calculation
  4. What is 1cm in mm?
  5. Pen colour 2: Label it as 10mm
  6. What is the area in mm? Show the calculation
  7. What is the scale factor between the sides? the area? why?


Three colours

  1. Draw a square on the board
  2. Pen colour 3: Label it as 1m
  3. What is the area? Show the calculation
  4. What is 1m in cm?
  5. Pen colour 2: Label it as 100cm
  6. What is the area in cm? Show the calculation
  7. What is the scale factor between the sides? the area? why?
  8. Repeat in pen colour 1 for mm

Four colours

Well not actually four colours – pens 2,3 & 4 only. Repeat the process for kilometres to metres and centimetres.

Volume – same process, just three dimensions

Why all the colours?

By coding each unit of measurement with a colour students can see the progression of the calculations and the links between area/volume and scale factor. After all, an okay mathematician can reproduce memorised facts, but a great mathematician doesn’t need to memorise – they understand where the calculations came from.

345. Practical percentage skills

It’s perfectly obvious that fluency in the use of multiplication tables directly impacts students ability to divide. This grows into confidence with algebra and reverse operations. Students are able to see the links between the concepts. Our understanding of the importance of such skills is part of the success of programmes such as TTRockstars and Numeracy Ninjas.

Why is it then that so many textbooks, websites and resource banks keep the manipulation of percentages as separate skills sets? Percentage increase / Percentage change / Reverse percentages. We know that when concepts overlap, fluency increases when these links are pursued. So that’s what I set out to do.

I have a bright Year 8 class and started working on percentages with them. It didn’t take much to have them confident using equivalent decimal multipliers to find percentages of amounts. Using a multiplier for increase/decrease was a walk in the park. Then finding percentage change came up. Over the years I’ve seen a lot of students get very confused with half remembered methods:

“Which do I take away?”

“What number do I divide by?”

“Is this calculation the right way around?”

I tend to teach new value divided by old value and interpret the answer. It got me thinking – why am I teaching them this? They can increase by a percentage using a multiplier, why can’t they rearrange their working to find the actual percentage? Same goes for reversing a percentage.

After a good discussion, I used this worksheet to recap and develop their skills:

Percentages Linking concepts questions

Percentages Linking concepts answers

Warning: “Original Amount” section, question (d) is a tricky one.

As with all new approaches, it’s always good to see if it worked. I set the following task from Don Steward’s website:

MEDIAN percent problems

I have GCSE students who wouldn’t know where to start on those questions, yet my Year 8 with their ‘have a go’ attitude were absolutely awesome. I’m definitely using this method again!