Tag Archives: wall display

272. Mr Men Maths Mobiles

Are you a fan of ‘The Mr Men’? Are you a hopeless Maths geek? Get yourself over to SolveMyMaths!

I’m sure I’ve mentioned the brilliant Maths Mr Men and Little Misses before. Here is what I did with the set I printed and laminated (click on each picture to enlarge):

MrMen3

There are three sections to this display: the title tetrahedron, the mobile and the invisible wall.

Title tetrahedron

MrMen4

You will need: six garden canes, four strong elastic bands, sugar paper, tape and your title.

It’s a straightforward tetrahedron made from canes, with the corners secured with elastic bands. Then stick your title to the paper and wrap it around one face, trimming sticky-out bits and securing with tape. It ‘s a good way to make sure no one accidentally walks into your mobile.

The mobile

MrMen1

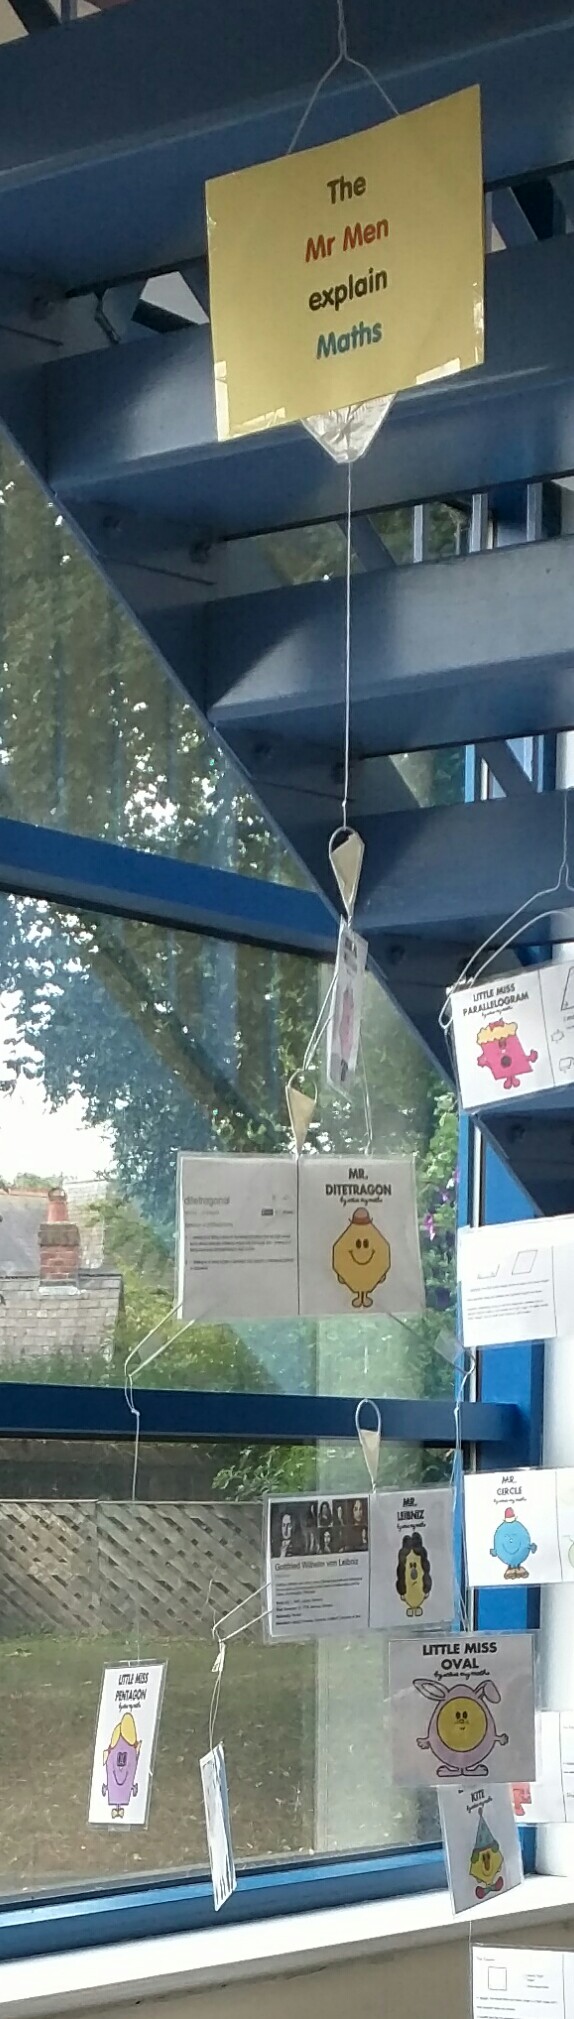
You will need: four wire coat-hangers, tape, Mr Men cards, fishing line and your title

My mobile is long and narrow because of the space I hung it in. The title hanger has been stretched into a rhombus shape and had a long loop of fishing line attached. The ends of the line were covered in white duct tape which you can see at the bottom of the title as a white triangle. The title was attached front and back.

The lower hangers were bent into a ‘C’ shape by pushing the straight base of the hanger upwards. Tape was wrapped near the ends of each arm to ensure the hanging shapes don’t slide along. Fishing line is threaded through the loops at the end of the arms and knotted. The knots are concealed inside the Mr Men cards, which were one sided. When I attach the remaining hangers to other things I squeeze the hook closed and cover the join in duct tape – it saves it unhooking later.

Invisible wall

MrMen2

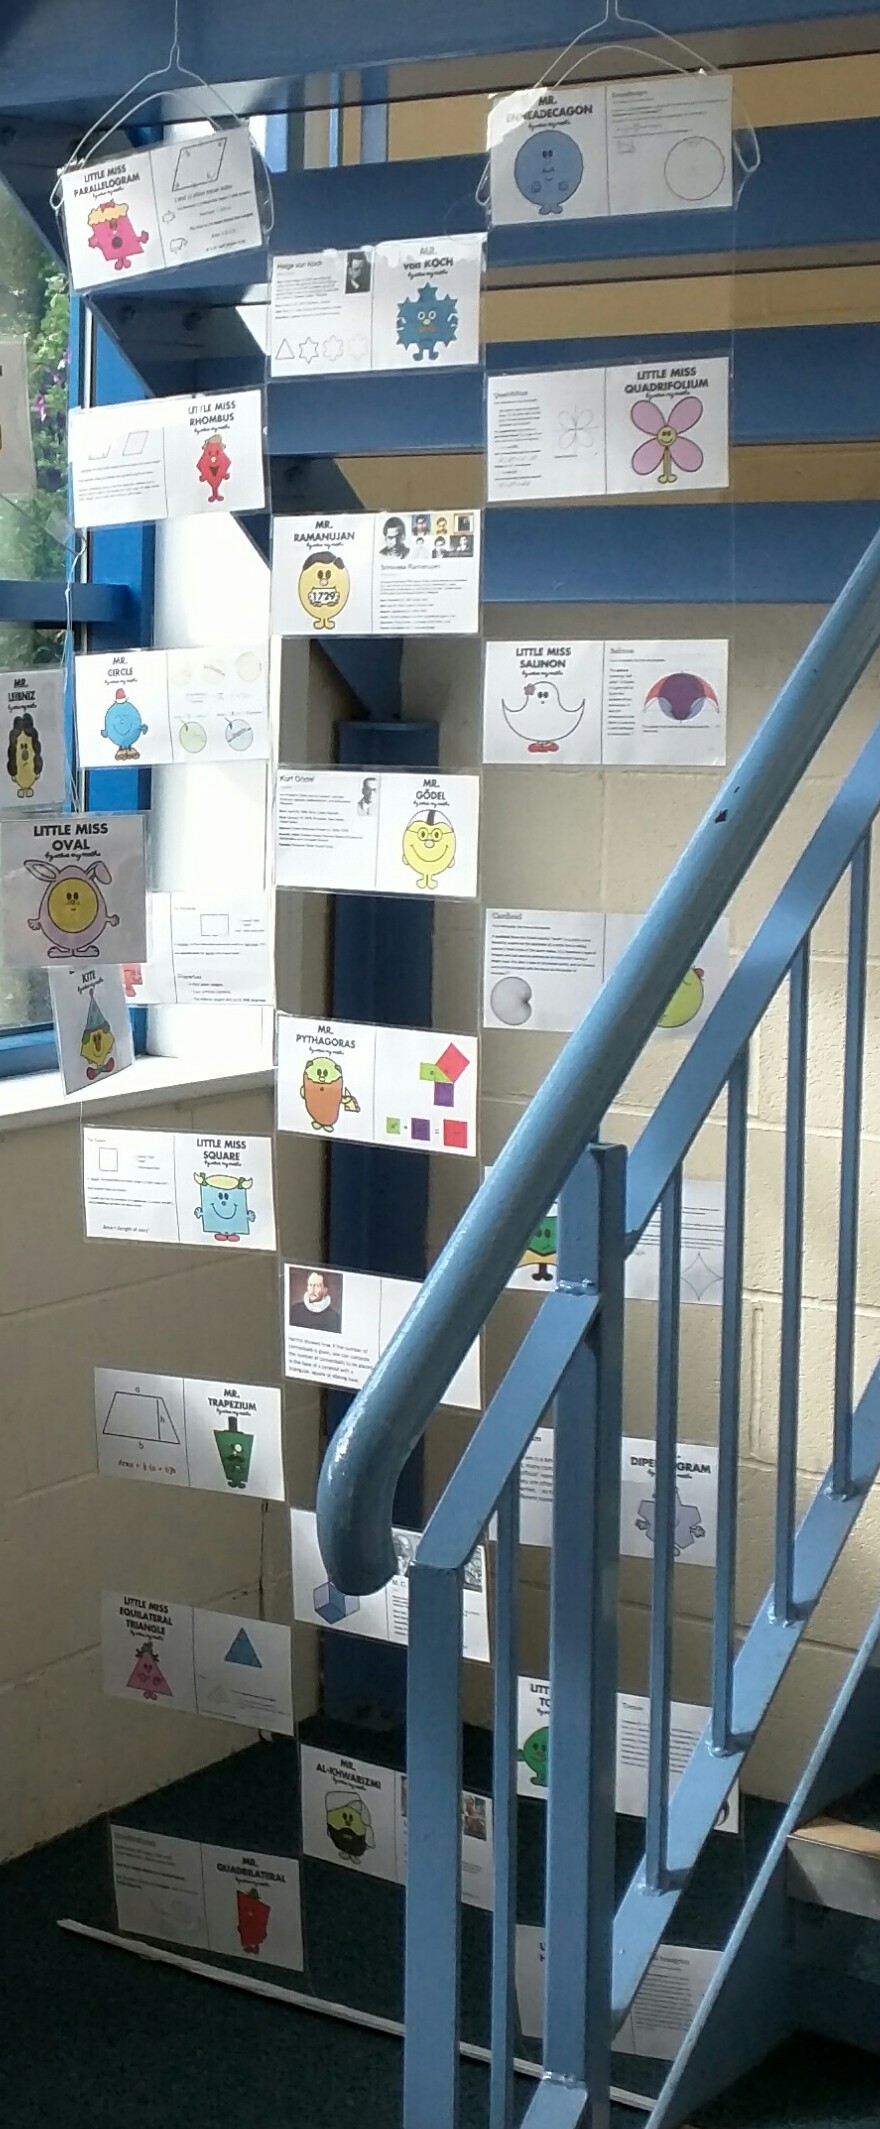
You will need: duct tape, fishing line, wide Mr Men cards, sellotape, two coat-hangers and an old metre stick (or equivalent).

I found an old, split metre stick in the back of the stockcupboard and covered it in duct tape to make it safe. I marked out three Mr Men card widths across and attached long lengths of fishing line. The knots were held secure and camouflaged by more duct tape. I bent the two coathangers into the C-shapes mentioned earlier and hung them in the final position. The next bit is tricky – you need to knot your fishing line to each arm of the coat-hangers whilst ensuring you keep the line parallel and the hangers level. I found standing on the metre stick was very helpful!

That’s your invisible ‘wall’ set up – now for the wall display!

Attach your first two Mr Men cards between lines 1 & 2 and 3 & 4 by wrapping tape around the ends of the cards, encasing the line at the very end. Attach your third card above the first row between lines 2 & 3. Keep repeating until you wall is complete. I decorated the hangers with extra cards.

Safety

As you can see, my display is hanging off a metal stair case. For safety, I flattened the coat-hanger hook against the stair rise and sealed it with duct tape so no one will catch their toes.

Observation

I’ve already seen a student stand in-front of the display and discuss it with her teacher and lots of students are actively looking/reading as they go up the stairs. It’s only been up two days and it is a talking point. It’s sure to grow as there are more Mr Men & Little Misses that I haven’t yet printed.

Thank you @solvemymaths!


254. Laminated Feedback

I love tessellation! You get the chance to be a bit more artistic and creative. I’m a fan of this particular website too: http://www.tessellations.org/ The website has examples of fine art and student work, how to make different types of tessellations and even 3D tessellations.

Now I’m sure we all often use tessellation as a homework – the ‘Finish off your amazing classwork at home’ kind of thing. When collection time comes you get many different standards of work:

  • Beautiful felt pen designs
  • Beautiful coloured pencil designs
  • Designs that started well and went a touch wobbly when they were rushed
  • Beautiful, but slightly wrong designs
  • Beautiful to begin with, then got crushed in a bag designs
  • Didn’t do the homework designs

All, apart from the last case, can be enhanced and developed with the use of a laminator and a guillotine.

Why a guillotine?
To trim off rough edges and forgiveable errors where the student got muddled at the edge of the paper.

Why a laminator?
Laminating the work flattens out any crushed/folded bits. It also preserves decorative edgings when the work is on the wall.

Students who spend ages with coloured pencil produce lovely work which just doesn’t stand out:

image

However, laminating it makes the colours more vibrant:

image

It’s hard to show the difference in a photograph, but take my word for it – it works!

You mentioned feedback?
It’s tricky to feedback on visual work without writing an essay or scrawling over the work. A simple solution is to use a marker pen to write on the laminate. Hand out the laminated work and board pens. Students can critique each other’s work by drawing around the individual tiles and annotating them, any errors can be highlighted and other comments made. The wipe-off pens make it less threatening and avoid permanent marks. The great thing is that the original work is not damaged and all comments can be removed with a damp cloth. Of course if you are using this for a wall display teachers may want a more permanent pen for feedback.

Final display

These works of art will be more hardwearing than your average display. You could hole-punch the corners and tie them together to make a wall hanging. You could laminate work back to back and hang them from the ceiling. You could even use the wall hanging as a temporary curtain if you have a rail in your room.

229. Speed Camera Maths

Speed Cameras are so last century: discerning law enforcement agencies favour the Average Speed Camera!

image

These motorway delights timestamp when you go through certain checkpoints and calculate your speed between them. No complicated laser guns required, just number plate recognition and a little distance/time calculation. This already sounds like a KS3/4 class activity or a Mechanics A-Level starter.

Equipment
Squared paper
Pencil
Ruler
Coloured pens
Calculator (optional)

Question
Can you find three different (safe) strategies for staying on the right side of the law through extended roadworks? You must average 40mph over 12 miles (original speed limit 60mph).

Visual Prompt
To start off with just draw out blank axes and discuss how you could visually represent this problem.

Idea 1
A distance-time graph

image

Idea 2
A speed-distance graph

image

Idea 3
A speed-time graph

image

The straightforward option
How long should it take you to get through the roadworks if you stick to exactly 40mph? What does this look like on a graph? Which type of graph shows this information best?

Top Gear Alert
The boy racer wants to go fast, but avoid a ticket – what could he do?

Hint
What does ‘Average Speed’ actually mean?
Can you instantly jump between speeds?
Is acceleration going to effect your calculations?
What assumptions should you make about acceleration?
Do you need to work out the area under the graph or the gradient at all? How will you do this?
Can you describe what is going on?
Is it safe/legal?

Outcome
Your students should be able to produce many different graphs of how to stay on the right side of an average speed zone. They should be able discuss their findings with each other. However the morality or safety of their driving ideas may be a topic of discussion for a later PSE lesson …

227. Back to School Bunting

Welcome back to the Sandpit! Hope you’ve had a good Summer!

It seems a shame not to keep that summer vibe going, so I thought I’d go back to an old post and reinvent it for a village fete, ‘Great British Bake Off‘, barbeque with friends feeling.

Back in post ’54. Space Saving Displays’(April 2013) I gave an instructional on how to make and use mathematical bunting. Over the summer some great teachers have shared how they are decorating their classrooms with their own twist on old fashioned bunting. I suggest you visit:

Just Maths @Just_Maths

Ideasfortheclassroom @missradders

Today’s post will give you three suggestions:

  1. Pupil orientated, maths or pastoral
  2. Ready made
  3. Teacher made, with downloadable templates and flags, with an emphasis on multiculturalism

So here we go:

1. Hands across the room

Equipment

  • Paper/card
  • Pens
  • Scissors
  • String/treasury tags

(a) On a sheet of A4 card, get pupils to draw around their hand open and closed:

image

(b) Cut out the hands – if you turn them over you won’t see the outlines:

image

(c) You could get the class to use different colours to make it more cheerful. Don’t these look a bit like wings?

image

(d) The open hands represent a bad habit or trait that students would like to get rid of (or do less). By having the hands downwards the habit is falling out of their hands. Pastorally you could guide students to targets that are appropriate academically or socially. Mathematically these could be study habits or misconceptions. As you can see from the photograph below, it can be tricky getting the wording right – the most important thing is your student understands what they mean.

image

(e) As mentioned before, the closed hands when paired correctly look like wings. These are for their positive aspirations and goals. A bit cheesy, but you are letting their dreams have wings! If you have time, students could decorate these flags – they can focus on the positive, not the negative. A few years ago, one of my students did this across two hands and reworded the aspiration as ‘These are the hands of an International Rugby player!’ – a big target for a 14 year old, but by the time he left school he was on the County Rugby team, so who knows …

image

(f) Finally string these up around your room. They won’t get in the way of your existing displays and you can reference them throughout the year.

(g) I was also thinking of taking this idea to a pastoral Year meeting and getting all the tutor teachers to do this activity and then hang them in our line manager’s office!

2. Ready made bunting

I happened across the bunting kit in my local Hobbycraft – it usually retails for £2 and includes 25 flags and the string. The link takes you to the relevant page of their website. Similar products are available online from other craft retailers and Amazon.

image

So if time is tight or you are a little wary of trusting an interesting class with a practical activity this could be a good alternative. You could put bad habits on one side and aspirations on the other.


3. Teacher made

This bunting demonstrates the beauty (and mathematics) in art from other cultures. The examples come from many cultures including Islam, Buddhism and Christianity and places such as Uzbekistan, Jaipur and Barcelona.

image

The flags are available to download here:

Multicultural bunting (pdf)

Details:

  • Page 1 gives you a blank template
  • Pages 2-16 are images with cutting templates on – they show you the original uncropped images.
  • Pages 17-18 are the image credits, should you wish to use them.

I printed out my flags onto light card, then laminated them. For added durability I put metal eyelets in the corners (see below). This is by no means essential, but if you are interested in card making or scrap-booking, you may well have some of them in your craft drawer.
image

Have a great back to school!

220. Terrific Tiles

I take no responsibility for this blog post. It is all down to the amazing teachers I work with. We have recently had our Year 6 open day and one of the activities was this amazing tessellation:

image

As you can see each rhombus has a pattern or picture which links to the next rhombus. You can stand in front of the full wall display and spend ages tracing the different routes across the wall. The clever use of colour means that from a distance the wall pops out as 3D cubes. Older students at school have commented that the display is ‘Awesome!’ and ‘Amazing!.


It was inspired by Vi Hart’s videos on snakes and doodling: YouTube

217. My Learning Wall

Last week I responded to a request on Twitter from @missradders for people to share their wall display ideas. I tweeted a picture of my ‘Learning Wall’, which is a collection of the best ideas from other teachers from this year. I was surprised by the number of teachers who liked it and wanted to know what was on there. So here you go – my ‘Learning Wall’ with interactive links to where all the ideas and resources came from. If you hover your mouse over the image hotspots will appear. It is made using the ThingLink website, using a free teacher subscription.

203. Sunny Surd Sunflower

Today we have a guest contributor to the Sandpit – my colleague BH.

His Year 9 class have been studying Surds. They have just completed two particularly difficult Tarsia puzzles on simplifying surds. He celebrated their success by getting the class to create a ‘Sunny Surd Sunflower’ – what a great way to celebrate springtime and achievement.

image

UPDATE: Inspired by the bright sunflower, my class created an AVERAGE caterpillar!

image